Saturday, December 31, 2011

Happy New Year to You!!


Here's to a fun celebration...and a happy & prosperous new year!

Thursday, December 29, 2011

How To Make Gold Leafed Candlesticks

If you are like me, your taking this week kind of slow and enjoying some down time. But, if down time for you just happens to include a little DIY'ing, here's a fun way to update worn or old candlesticks with a little sheen!

Materials Needed:

  • collection of candlesticks in varying heights
  • fine-grit sandpaper
  • tack cloth
  • gold-leaf sheets
  • liquid adhesive
  • gold-leaf sealer
  • gold-leaf antiquing
  • 2 foam brushes


Gather Supplies

Find a collection of old or worn candlestick holders and collect needed supplies.

Sand Surfaces

Lightly sand candlestick holder surfaces to remove any existing finish.

Wipe Clean

Wipe away dust with tack cloth.

Apply Adhesive

Brush all surfaces with gold-leaf liquid adhesive. Let set approximately 30 minutes until tacky.

Apply Gold Leaf

Lay sheets of gold leaf over candlestick surfaces and press into place with foam brush. Repeat until entire surface is covered.

Wipe Away Excess Leafing

Brush away loose particles with foam brush.

Apply Sealer

Brush on layer of gold-leaf sealer. Let dry 30 minutes.

Apply Antiquing Finish

Brush on layer of gold-leaf antiquing finish.

Rub In and Wipe Away

Rub antiquing finish into cracks and ridges. Wipe away any excess with rag.


To see this and other ideas for decorating DIY style, visit HGTV.com

Saturday, December 24, 2011

Happy Holidays From Frosty Oregon!

We haven't seen snow, yet. But a layer of frost coating everything in sight, paired with foggy skies, has created an atmosphere nearly as pretty!


These pictures are taken in a nature preserve behind our house...
I feel lucky to have such a wonderful place just steps away!


Happiest of Holidays to you and your family!!
Janell

Friday, December 23, 2011

How to Make A Votive Candle Runway For Santa!

Whether you live in a home with young children who are excitedly awaiting the arrival of Santa, or merely want to create a festive welcome for guests arriving during a party, here is a simple way to light the way!

Side note: Looking at these pictures I just have to smile! This is a tutorial I was asked to write last winter for HGTV.com, and I wasn't certain I'd actually be able to pull it off. I mean, we don't have snow every year in the NW. However, I gathered my supplies, took the "steps" photos and then set everything by the front door to wait for snow to capture the "beauty shoot." Perhaps I'd get lucky before the article deadline and snow would magically appear at my front door. Well what do you know, one night the weather report claimed snow might just arrive early the next morning. So I set my alarm for a crazy hour and amazingly snow was falling! I quickly moved out the glass cylinders, lit the candles and started capturing photos. This brief snowfall ended up being the only snow we saw all winter, talk about luck.

A few minutes later I heard screams of delight. The kids had awaken and wanted to get out and play in the snow asap...at a few minutes past six! I blew out the candles, bundled them up and off we went to make snowmen! What fun, I hope we are as lucky this year.

Materials Needed:

  • several glass cylinders or mason jars
  • rock salt
  • votives
  • length of garland
  • matches


Gather Supplies

Select glass cylinders or jars and gather votives and rock salt.

Fill Containers

Pour rock salt into each container, filling approximately 1/5 full.

Place Votives

Arrange votive in each container, pushing votive down into salt to secure in place.

Light Candles

Light candles, arrange along steps and enhance with a length of garland.

Wait for Santa to Arrive

Enjoy your handiwork, set out some milk and cookies and get ready for the man in the red suit to make an appearance.

To read this and other holiday decorating ideas visit HGTV.com

Monday, December 19, 2011

What Will Be In Your Stocking?

Stockings hung on the fireplace, what a magical tradition for children.
And for adults as well, if you were to awake on Christmas morning to a few of these treasures!


From the Holiday issue of House of Fifty

Enjoy the Season!

Friday, December 16, 2011

Best Holiday Ideas Spied!


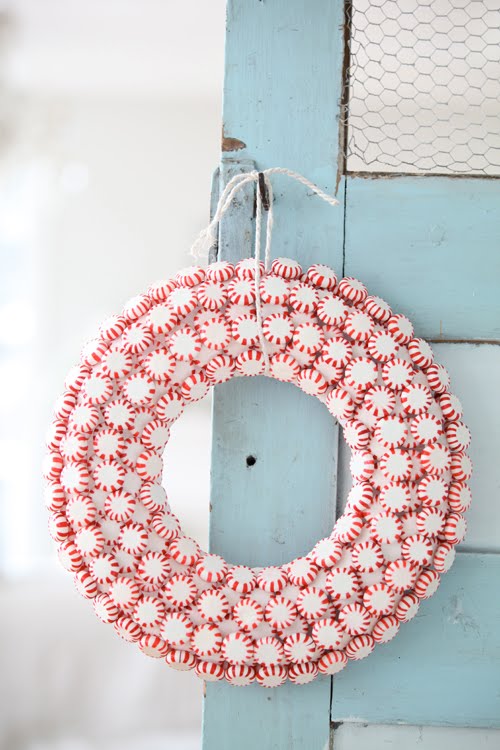
DIY Peppermint Wreath on Turquoise Door via Dreamy Whites


Greenier in Boots, Adding a Bit of Holiday to an Entry, via the Nester.


Bright Ornaments Attached to Branches Set in a Silver Vase, via Mrs. Limestone.

The holidays certainly are a pretty time of year!

Thursday, December 15, 2011

Holiday Mix & Match Fashion


Heading off to fun Holiday Festivities? Here are some mix & match fashion ideas!

Via Laurie Moulton of House of LoLo for House of Fifty